
You've signed up for Mailomia. Now it's time to get your first newsletter out. This walkthrough covers the setup, from connecting Amazon SES to checking your campaign results.
If you already have a domain and a subscriber list, the steps inside Mailomia should take around 30 minutes. AWS can add some waiting time, though. DNS verification isn't always immediate, and if your SES account is still in the sandbox, AWS needs to approve production access before you can email your subscribers.
Here's what you'll need:
- An AWS account, or the ability to create one during setup.
- Access to your domain's DNS settings through your registrar or DNS provider, such as Cloudflare, OVH, or Gandi.
- A CSV file of opted-in subscribers, if you already have a list.
Don't have subscribers yet? That's fine. You can complete the setup now and add a signup form later. You don't need to import contacts just to get familiar with Mailomia.
1. Create your Mailomia account
Sign up at app.mailomia.com. No credit card is required. Mailomia's free plan includes up to 5,000 emails per month. Amazon SES sending charges are billed separately by AWS.
2. Connect Amazon SES
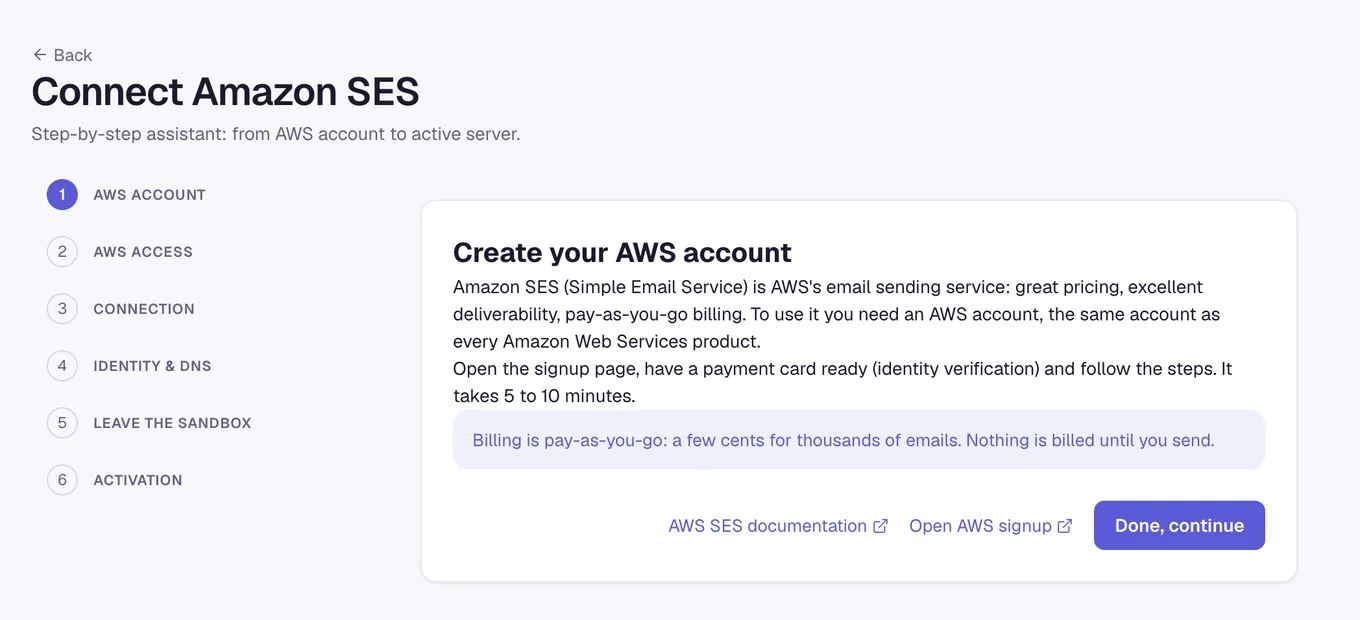
In Mailomia, go to Sending servers and select Connect Amazon SES. The setup wizard walks you through six steps:
- AWS account: If you don't have an AWS account, follow the wizard's instructions to create one.
- AWS access: Click Create the stack in AWS. This creates a role in your AWS account with the permissions Mailomia needs for SES and SNS. You won't need to paste AWS access keys into Mailomia. You can revoke access later by deleting the stack.
- Connection: Enter your 12-digit AWS account ID. Mailomia checks that the connection works.
- Identity & DNS: Enter the domain you want to send from. Mailomia creates the SES identity and shows you the DNS records needed for DKIM, a custom MAIL FROM domain, and DMARC. Add them within the 72-hour window shown in the wizard. Verification may take some time, depending on your DNS provider.
- Leave the sandbox: If your SES account is still in the sandbox, you'll need AWS approval to send to unverified addresses. The wizard asks a few questions, drafts the request from your answers, lets you review and edit it, then sends it to AWS for you. AWS wants to know how people subscribe and how you handle unsubscribes, bounces, and complaints. AWS makes the final decision.
- Activation: Choose your sender address and activate the sending server. Mailomia sets up bounce and complaint handling.
Not sure what DKIM, SPF, or DMARC mean? Our Amazon SES deliverability guide explains what they do. You don't need to become an email authentication expert to follow the setup wizard.
3. Create a list and import subscribers
Go to Lists and select New list. Give your list a name, set the default sender, and enter the business information that will appear in your emails. Then create the list.
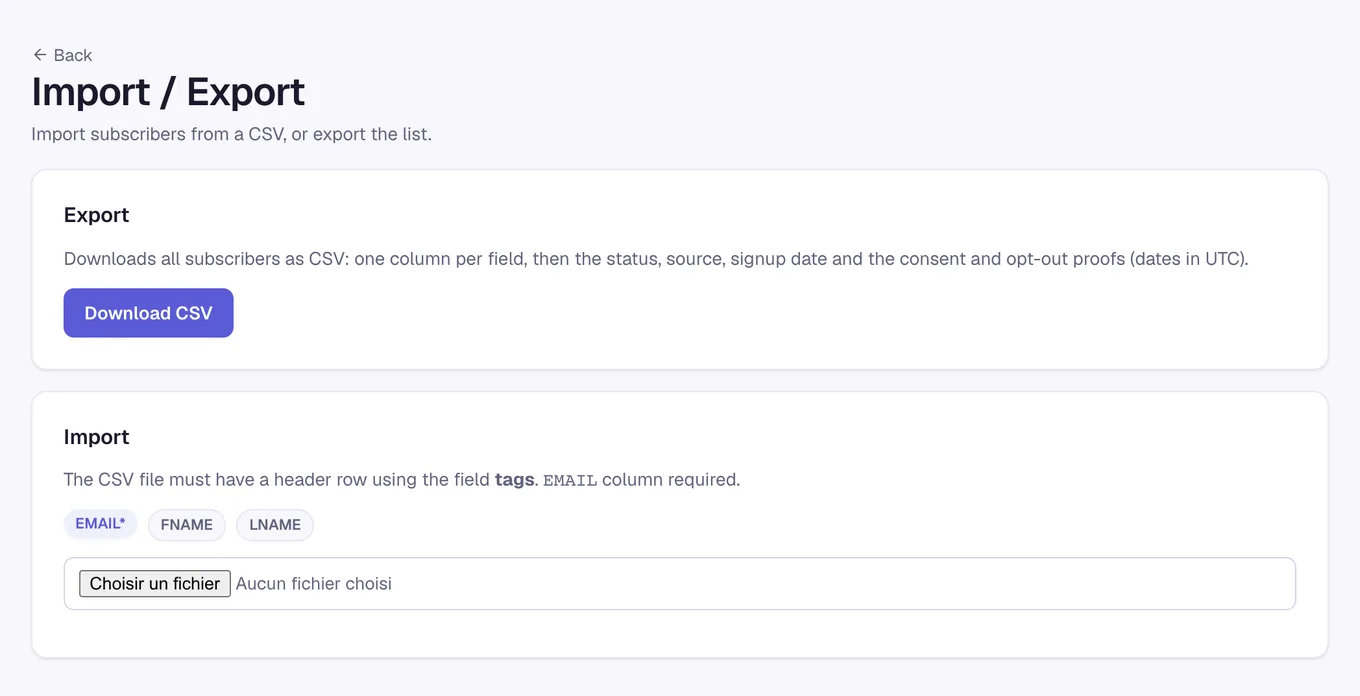
If you already have subscribers, open Import / Export and upload your CSV. The first row must contain the field names. EMAIL is required; FNAME and LNAME are used for first and last names.
EMAIL,FNAME,LNAME
claire@example.com,Claire,Martin
paul@example.com,Paul,Durand
Before importing, check where those addresses came from. Only upload people who agreed to receive your emails. If you're moving from another platform, leave out unsubscribed contacts and addresses flagged as invalid. Keep your consent records, too.
4. Build your newsletter
Open Templates and select New template. You can use the visual editor to add text, images, buttons, and other blocks, or switch to the HTML editor if you already have your own email code.
You can also start with a design from the Gallery, or use Import a ZIP to bring in an existing HTML template.
Want to greet subscribers by name? Tags such as [FNAME] insert their first name. Make sure the email still reads well for contacts who don't have a first name saved.
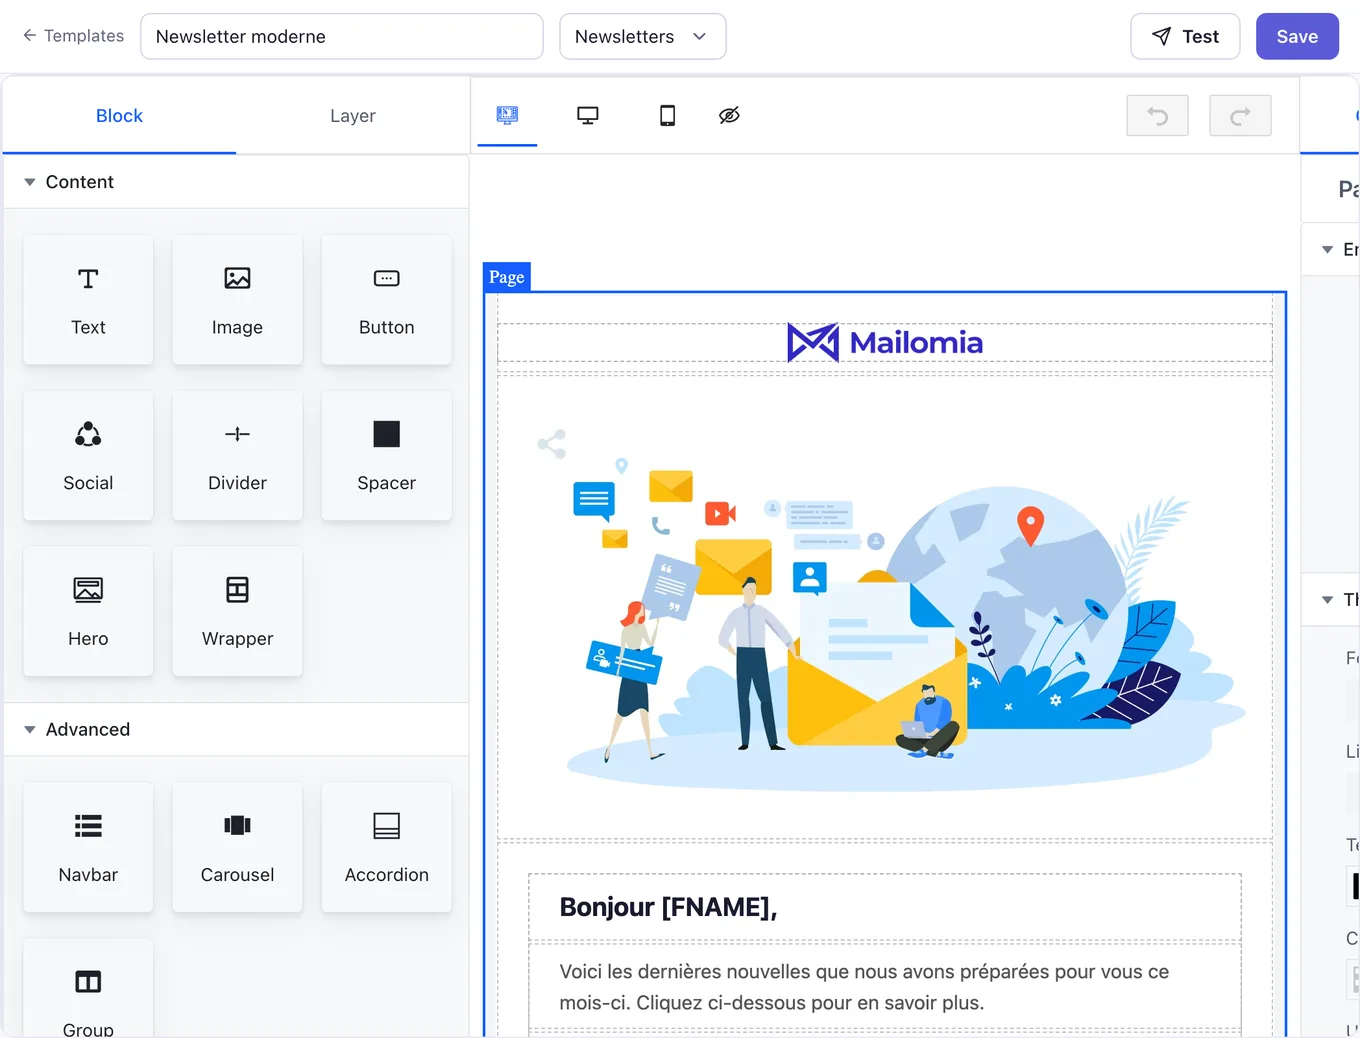
Use Test to send yourself a preview. Check it on both desktop and mobile, make sure the images load, and click every link. An email can look fine in the editor and still render differently in an inbox.
5. Set up and send your campaign
Go to Campaigns and select New campaign. You'll work through five screens:
- General: Choose a regular campaign, give it an internal name, and select your list. You can target a segment instead of the full list if you prefer.
- Settings: Set the sender name and address, reply-to address, subject line, and preview text (preheader). Use a sender name your subscribers will recognize.
- Content: Pick your template, make any final edits, and run the spam check.
- Advanced: Configure optional features such as subject-line A/B testing. For your first campaign, keeping things simple is perfectly reasonable.
- Confirmation: Review the summary and click Send me a test. When everything looks right, send the campaign now or schedule it for later.
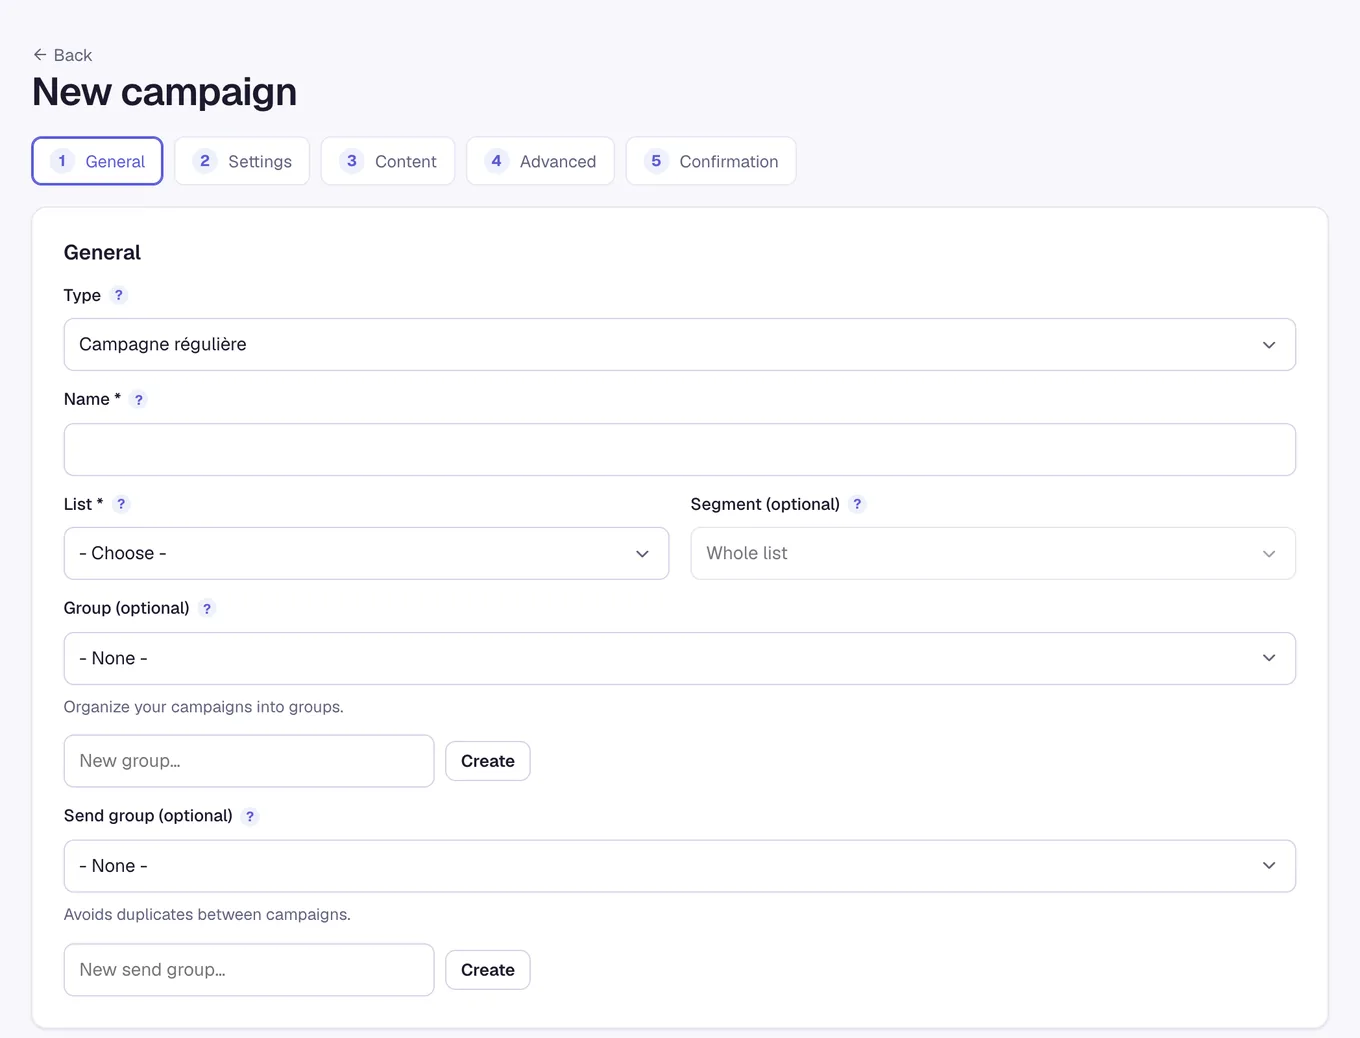
Before you hit send, double-check the audience, subject line, reply-to address, and links. And if your domain has never sent newsletters before, don't start by emailing a huge list all at once. Build up your sending volume gradually.
6. Check your campaign results
Once your campaign has been sent, open its report under Campaigns. You'll see how many people you targeted, how many emails were delivered, unique opens and clicks, bounces, unsubscribes, and complaints. You can also review your most-clicked links, activity over time, and breakdowns by device and country.
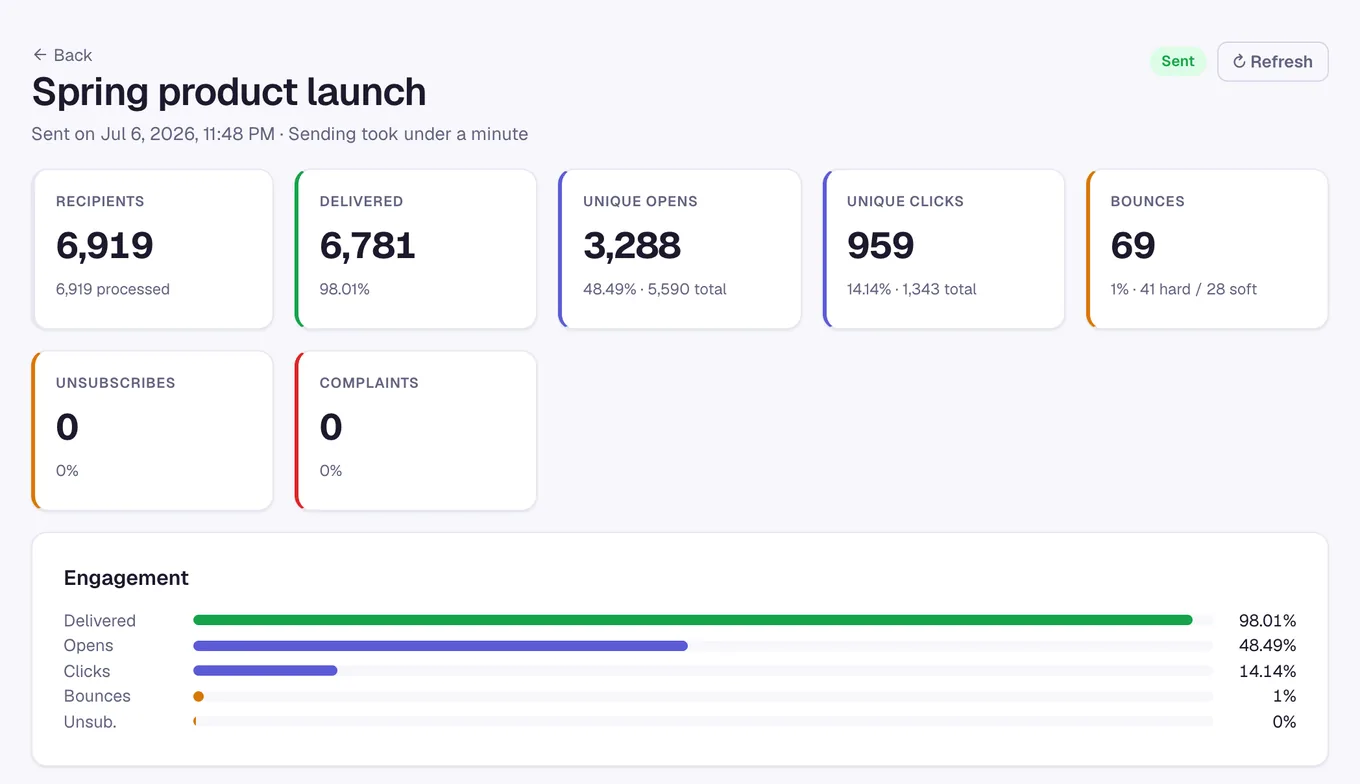
A quick note on those numbers: delivered means the receiving mail server accepted the message. It doesn't guarantee the email landed in the primary inbox. Open rates aren't exact either, especially with privacy features that affect open tracking.
Mailomia handles bounces and complaints so affected addresses aren't included in future campaigns.
What to do next
With your first campaign sent, you can add a signup form from your list settings, enable double opt-in, and create segments for more targeted emails.
If you're sending from a new domain, keep increasing volume gradually rather than jumping straight to your entire list. Our Amazon SES deliverability guide covers the signals worth watching as you grow.